
Last updated on September 23, 2018 by Liza Hawkins

Andrew reached out to me a few weeks ago about guest posting. His interest?
Molecular Gastronomy!
I find that fascinating, and it’s not something I’ve ever tried at home, although I have had food prepared that way out in restaurants.
Hope you enjoy!
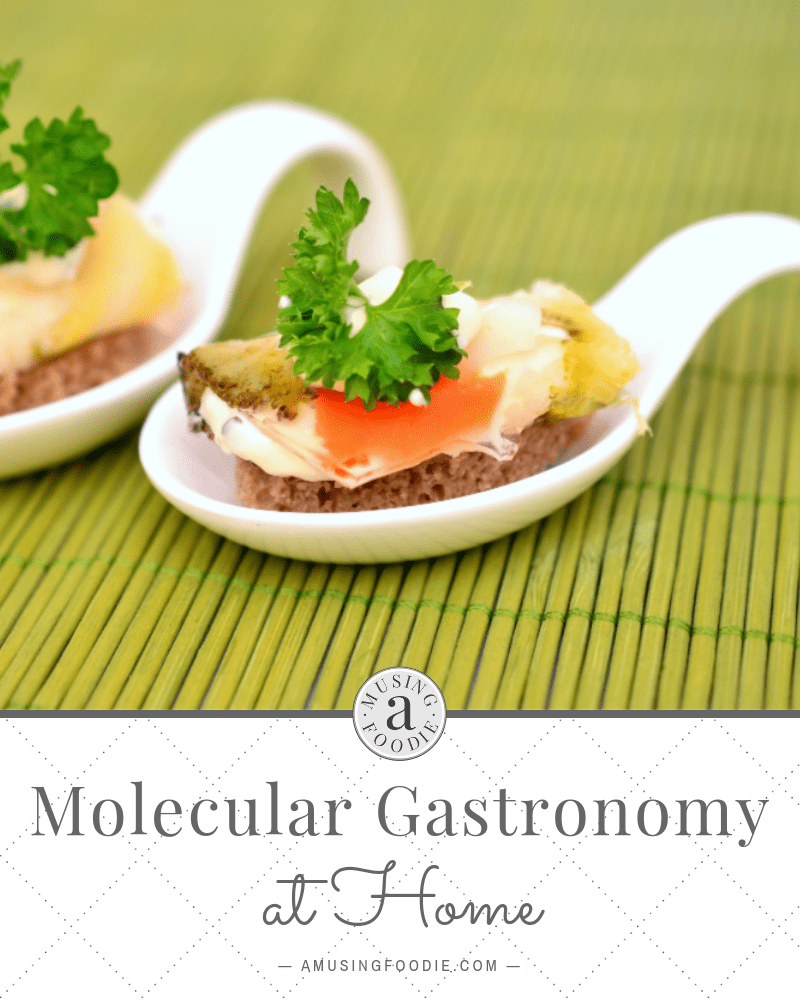
Food + Science: An Introduction to the Wild World of Molecular Gastronomy at Home
Before I jump right into the three most popular techniques that you should know from molecular gastronomy, I better answer the biggest question about it:
What is molecular gastronomy?
In short, it’s a different way of looking at cooking. David Lebovitz makes the comparison to painting: it’s like a new movement, with its own aesthetic, techniques, and famed proponents (don’t forget the detractors, either).
Like any movement, it has spawned lots of change.
The folks behind molecular gastronomy are asking new questions and exploring new directions.
Sometimes, they’re really and truly scientists: they’ve got big labs and advanced equipment that they use to discover secrets from the chemistry of cooking.
Lucky for us, you don’t need a science PhD in order to take advantage of their discoveries.
In the rest of this blog post, I’ll walk you through some of the most famous, delicious techniques of molecular gastronomy.
Spherification: little pearls of delish!
Do you like caviar?
Do you wish more things could be made into caviar?
Spherification can help you do just that.
It’s the process of turning any liquid into little pearls of deliciousness that will literally burst with flavor.
To “spherify” your juice, you’ll need sodium alginate as well as either calcium lactate or calcium chloride.
They combine to form a gel around the outside of a juice while leaving a liquid centre.
Passion fruit caviar
Equipment:
You’ll need an immersion blender, a small digital scale, a squeeze bottle, and three large cups.
Ingredients:
- 2 grams of sodium alginate
- 5 tbsp of passion fruit syrup
- 2.5 grams of calcium chloride
- 750 grams of water, divided
Directions:
- With the immersion blender, blend sodium alginate into 100 grams of water.
- Mix the passion fruit syrup with 150 grams of water. Combine with the alginate solution, and let sit for an hour until the bubbles are gone. Insert into the squeeze bottle.
- Blend the calcium chloride with 500 grams of water. Once it is fully blended, add the passion fruit solution into the calcium chloride solution, drop by drop. Remove the pearls after 1-3 minutes.
- Place the pearls in a fine mesh sieve and rinse gently but thoroughly, as any remaining calcium chloride will impart a bitter taste to the caviar.
Emlusification: it’s foam!
If ever there has been a complaint against molecular gastronomy, it’s been for the fact that it’s called “molecular gastronomy.”
It’s a lofty, technical, and inaccessible term, and that’s not in the spirit of cooking, right?
So let’s cut down on the mystery by calling emulsification what it is: foam-making.
It’s possible to foam-ify a liquid by adding nothing more than 2 grams of soy lecithin per cup of liquid and giving it all a good blending.
The soy lecithin binds the liquid into dense foam. Doesn’t “foam-ify” sound cooler than “emulsification”? Keep reading for a foam-tastic recipe.
Basil Foam
Ingredients:
- A couple dozen basil leaves
- 100ml water
- 100ml semi-skim milk
- 1 gram soy lecithin
Directions:
- Boil basil leaves in water and milk. Let cool, then strain.
- Whisk in soy lecithin, then let rest for a minute. Blend the solution with an immersion blender and combine with anything that tastes better with basil.
Transglutaminase: glue, for meat!
I like sticking bacon to other meats.
I like wrapping things in bacon.
But despite my love for eating bacon-meat combos, I hate cooking those things.
The bacon gets all misshapen, and heat doesn’t transfer evenly, leaving sections of undercooked or uncooked meat – not cool!
Enter transglutaminase.
Add a few grams to water, apply to some of your favorite meats, and stick ‘em together overnight.
The next morning you’ll find the two meats perfectly fused into something greater than the sum of its parts.
Now is the time to combine pork belly and chicken breast, or chicken skin and steak, or bacon and anything at all.
Before you get too crazy with transglutaminase, just remember that different meats have different cooking temperatures, so you’ll want to be really careful about what meats you choose and how to arrange them.
If you do it improperly, you could end up with dried up chicken and still-raw pork in the same bite, which could give you food poisoning.
So make sure you cook the whole dish to the minimum safe temperature!
Now it’s onto the fun stuff. This is a dish I’ve adapted from Cooking for Geeks by Jeff Potter, which I think is probably the best book to introduce a person to applied food science.
The way the book describes the act of cooking—and the detailed science behind it—is crucial to really getting molecular gastronomy.
Potter takes traditional recipes and does experiments to make them even more delicious.
Bacon-fused scallops
Ingredients:
- 8 large scallops
- 8 slices bacon, cut in half to wrap around the scallop with no overlap
- 3 tbsp transglutaminase
Directions:
- Combine the transglutaminase with 1/3 cup of water to form a slurry.
- Using a brush, coat one side of the bacon with the slurry, then place the scallop on the bacon, and roll the bacon around the scallop. Repeat for each scallop. Let sit in the fridge for two hours until bacon is firmly stuck to the scallop.
- Preheat your oven to 400°F/200°C. Place oil in a frying pan to hot; sear the non-bacon-covered ends of the scallops until brown (about a minute per side).
- Transfer the frying pan directly into the oven. Finish scallops in the oven for about five to eight minutes, until the bacon and the scallop are cooked.
Does this sound like your jam?
Well, a great resource for more molecular gastronomy recipes and techniques is Khymos.
At very least, it will point you in the right direction, as they review every book released.
Andrew K is a Community Coordinator over at ApplianceHelp.com. They’re a DIY home repair resource and a retailer of appliance parts, and they love to contribute to communities that they’re passionate about. They care about DIY, frugality, the environment, repurposing and helping homeowners tackle their own home repairs.

I’ve seen these techniques used on Iron Chef America and have stood in awe over the beauty of the food they create. Since I have a daughter interested in science, this might just be a direction in which I’ll need to look someday. Liza, thanks for sharing your spot with a guest poster. Andrew, thanks for an interesting and informative article!
Thanks a ton! It was a lot of fun to write this, and yeah, there are tons of food science experiments to be made that would be great learning experiences for the whole family. If you guys want to get started I’d recommend looking into one of the starter kits at http://www.molecule-r.com. They come with great instructions – it’s how I first got going with molecular gastronomy 🙂